Connect Namecheap Domain to KnownHost, and update the domain’s nameservers to KnownHost’s nameservers. This process is straightforward and enhances your website’s performance.
Connecting your Namecheap domain to KnownHost involves a few simple steps. First, log in to your Namecheap account and navigate to the Domain List. Select the domain you wish to connect to and click on the “Manage” button. Scroll down to the “Nameservers” section and choose “Custom DNS” from the dropdown menu.
Enter the nameservers provided by KnownHost and save the changes. This connection enhances your website’s reliability and speed. By following these steps, you ensure seamless integration and better site performance. This guide helps you achieve a smooth transition without hassle.
Prerequisites
Before connecting your Namecheap domain to your KnownHost hosting account, ensure you have the necessary accounts and access. These prerequisites are essential for a seamless setup.
Namecheap Account
First, you need a Namecheap account. Follow these steps:
- Visit Namecheap.
- Click on Sign Up.
- Fill in your details and create your account.
Ensure your domain is registered under this account. You will manage your domain settings here.
Knownhost Hosting Account
Next, you need a KnownHost hosting account. Here’s how to get started:
- Go to KnownHost.
- Select a hosting plan suitable for your needs.
- Complete the purchase and access your control panel.
Having access to your control panel is crucial. This is where you will configure your hosting settings.
| Prerequisite | Details |
|---|---|
| Namecheap Account | Register and manage your domain. |
| KnownHost Hosting Account | Purchase a plan and access the control panel. |
Ensure you have these accounts ready. This will streamline the domain connection process.

Credit: www.namecheap.com
Accessing Namecheap Dashboard
To connect your Namecheap domain to Knownhost, you must first access the Namecheap dashboard. This step-by-step guide helps you navigate through the process with ease.
Login To Namecheap
First, you need to log in to your Namecheap account. Follow these simple steps:
- Go to the Namecheap website.
- Click on the Sign In button located at the top-right corner.
- Enter your Username and Password.
- Click on the Sign In button to access your dashboard.
Navigate To Domain List
Once logged in, follow these steps to navigate to your domain list:
- In the left sidebar, click on Dashboard.
- Select Domain List from the menu.
- A table will display all your registered domains.
In the Domain List section, find the domain you wish to connect to Knownhost. This section provides a detailed view of each domain’s settings and options.
Changing DNS Settings
Connecting your Namecheap domain to KnownHost involves changing DNS settings. This process ensures your domain points to the correct web server. Follow these simple steps to make the changes efficiently.
Locating DNS Settings
First, log in to your Namecheap account. Navigate to the Domain List tab. Locate your domain and click the Manage button. This will open your domain settings page. Scroll down to find the Nameservers section.
Updating Nameservers
In the Nameservers section, you’ll see a dropdown menu. Select Custom DNS from the options. You will need to enter the nameservers provided by KnownHost.
| KnownHost Nameserver | Purpose |
|---|---|
| ns1.knownhost.com | Primary Nameserver |
| ns2.knownhost.com | Secondary Nameserver |
Enter these nameservers in the provided fields. Make sure there are no extra spaces. Click the green Save button to apply the changes. Your new DNS settings will take effect within 24-48 hours.
Setting Up Knownhost
Setting up your KnownHost server involves a few steps. Each step ensures a smooth connection between your Namecheap domain and the KnownHost server. Follow these instructions carefully to get your website up and running in no time.
Accessing Cpanel
First, you need to access your KnownHost cPanel. Here’s how:
- Open your browser and go to https://yourdomain.com/cpanel.
- Enter your username and password.
- Click the Log In button.
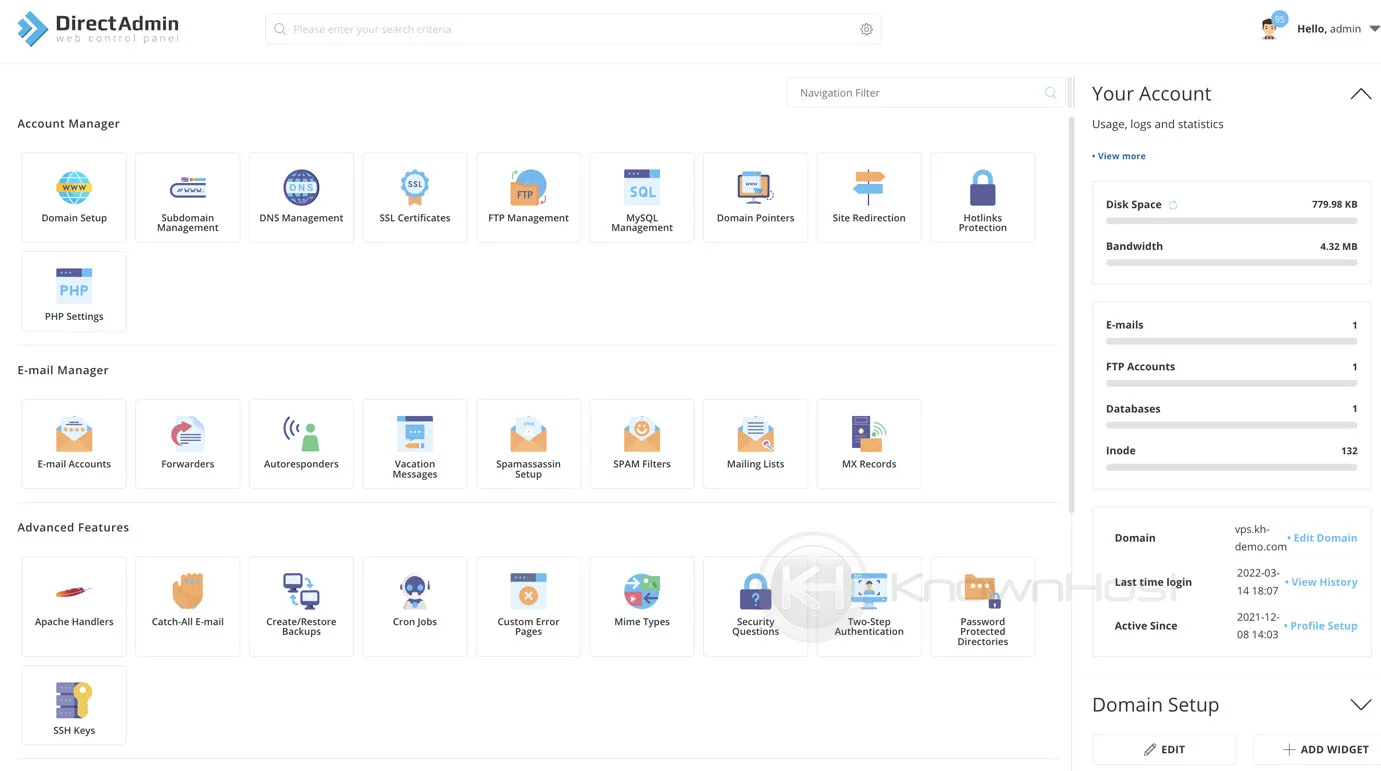
Once logged in, you will see the cPanel dashboard. This is where you manage your hosting account.
Adding A Domain
Next, you need to add your Namecheap domain to KnownHost. Follow these steps:
- In cPanel, find the Domains section.
- Click on Addon Domains.
- Enter your domain name in the New Domain Name field.
- The Subdomain and Document Root fields will auto-fill. You can edit them if needed.
- Click the Add Domain button.
Your domain is now added to KnownHost. You can manage it from the cPanel dashboard.
By following these steps, you ensure your domain is properly set up. This will help your website run smoothly.
Configuring DNS Records
Configuring DNS records is crucial for connecting your Namecheap domain to KnownHost. DNS records tell the internet where to find your website. Let’s dive into configuring these records efficiently.
Adding A Records
The A record maps your domain to an IP address. Follow these steps:
- Log in to your Namecheap account.
- Navigate to the Domain List tab.
- Click on Manage next to your domain.
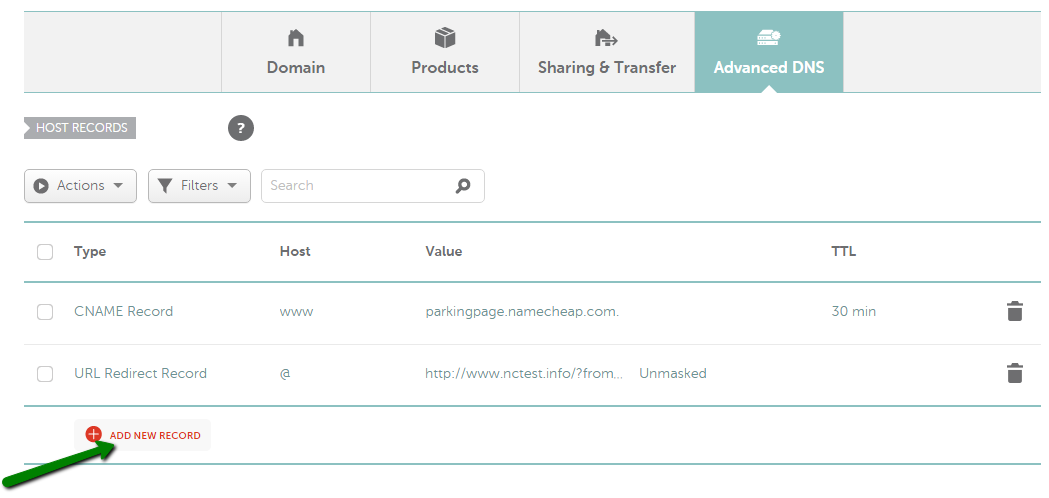
- Select the Advanced DNS tab.
- Under Host Records, click Add New Record.
- Choose A Record from the dropdown menu.
- In the Host field, enter
@for the root domain orwwwfor subdomains. - Enter the IP address provided by KnownHost in the Value field.
- Set the TTL to
Automaticand click the Save All Changes button.
Configuring Cname Records
The CNAME record maps your domain to another domain name. Here’s how to set it up:
- Log in to your Namecheap account.
- Go to the Domain List tab.
- Click Manage next to your domain.
- Navigate to the Advanced DNS tab.
- Under Host Records, click Add New Record.
- Select CNAME Record from the dropdown menu.
- In the Host field, enter the subdomain you want to alias (e.g.,
www). - Enter the target domain (e.g.,
yourdomain.com) in the Value field. - Set the TTL to
Automaticand click the Save All Changes button.
Following these steps will help you configure DNS records. Your domain will point to KnownHost efficiently.
Verifying Domain Connection
Once you’ve connected your Namecheap domain to KnownHost, it’s important to verify the connection. This ensures your website is live and accessible to everyone.
Propagation Time
After updating the DNS settings, the changes need time to propagate. This is known as propagation time. It can take from a few hours to up to 48 hours. During this period, your website might not be accessible to everyone.
To minimize downtime, plan your DNS changes during off-peak hours. This way, fewer visitors are affected.
Testing Domain
Once the propagation time has passed, it’s time to test your domain. This ensures the domain is correctly pointing to your KnownHost server.
- Open a web browser.
- Type your domain name in the address bar.
- Press Enter.
If your website loads correctly, the connection is verified. If not, double-check your DNS settings.
You can also use online tools to check DNS propagation. Websites like DNS Checker provide real-time updates on DNS status worldwide.
| Tool | Function |
|---|---|
| DNS Checker | Real-time DNS propagation check |
| WhatsMyDNS | Check DNS resolution across regions |
These tools help confirm that your DNS changes have propagated globally.
Troubleshooting
Experiencing issues while connecting your Namecheap domain to Knownhost? Don’t worry! This troubleshooting guide will help you resolve common problems and find the assistance you need.
Common Issues
Many users face similar problems during the setup process. Here are some frequent issues:
- DNS Propagation Delay: DNS changes might take up to 48 hours to propagate.
- Incorrect Name Servers: Ensure you have entered the correct name servers provided by Knownhost.
- Cache Problems: Clear your browser’s cache to see the most recent DNS changes.
- SSL Certificate Errors: Verify that your SSL certificate is properly installed.
- IP Address Issues: Confirm that your domain points to the correct IP address.
Where To Get Help
If you continue to face problems, there are resources available:
- Namecheap Support: Visit the Namecheap Support Center for articles and contact options.
- Knownhost Support: Check out the Knownhost Support Page for guides and live chat.
- Community Forums: Join discussions on Namecheap Community or Knownhost Forums.
- Social Media: Reach out on social platforms like Twitter or Facebook for quick responses.
By following these steps, you can resolve most issues when connecting your Namecheap domain to Knownhost. Happy hosting!

Credit: www.linkedin.com

Credit: 10web.io
Frequently Asked Questions
How Do I Link My Namecheap Domain To Namecheap Hosting?
To link your Namecheap domain to Namecheap hosting, update your domain’s nameservers to Namecheap’s hosting nameservers. Then, configure your domain in your hosting account’s cPanel by adding it as an addon domain or primary domain. This ensures proper linkage and functionality.
How Do I Link My Domain From Namecheap To Hostinger?
To link your domain from Namecheap to Hostinger, update your domain’s DNS settings. Use Hostinger’s nameservers provided in your account.
How Do You Connect Your Domain Name To Your Hosting Account?
To connect your domain to your hosting account, update your domain’s DNS settings. Log in to your domain registrar. Find the DNS settings and enter your hosting provider’s nameservers. Save the changes. Allow 24-48 hours for propagation.
How Do I Transfer My Domain To Knownhost?
To transfer your domain to KnownHost, unlock it and get the authorization code. Initiate the transfer via KnownHost’s portal. Approve the transfer email.
How Do I Point My Namecheap Domain To Knownhost?
Update the DNS settings in Namecheap to point to KnownHost’s nameservers. This connects your domain to your hosting.
What Are Knownhost’s Nameservers For Namecheap?
KnownHost’s nameservers are provided in your welcome email. Commonly, they are ns1. known host. com and ns2. knownhost. com.
Conclusion
Connecting your Namecheap domain to KnownHost is simple and efficient. Following the steps will ensure a smooth setup. Enjoy enhanced website performance and reliability. Keep your domain and hosting well-coordinated for optimal results. Feel free to reach out to support if you encounter any issues.
Happy hosting!


